

(A Practical Guide for the Iranian Diaspora and Food Lovers)
Let’s be real: finding high-quality Limoo Amani (dried limes) in international supermarkets or even local Middle Eastern shops is often a gamble. Sometimes they smell old and dusty, sometimes the inside has turned into a black powder, and sometimes they are so bitter they ruin the Ghormeh Sabzi you spent hours cooking.
But making them at home? It is actually much easier than you think, and the result is worlds apart from the store-bought version. When you dry them yourself, the aroma is fresh, citrusy, and the color—if done right—remains a beautiful golden-brown.
In this guide, we’ll get straight to the method. Here is how to make authentic dried limes in your own kitchen, no matter where you live.
To understand the distinct flavor profile of this ingredient, Wikipedia describes dried lime as follows
“Using homemade dried limes not only improves flavor but also ensures you get the full benefits of the fruit. As noted by food researchers, properly dried citrus retains essential oils and antioxidants that store-bought versions often lose due to poor processing.”
Step 1: Picking the Right Lime (Crucial!)
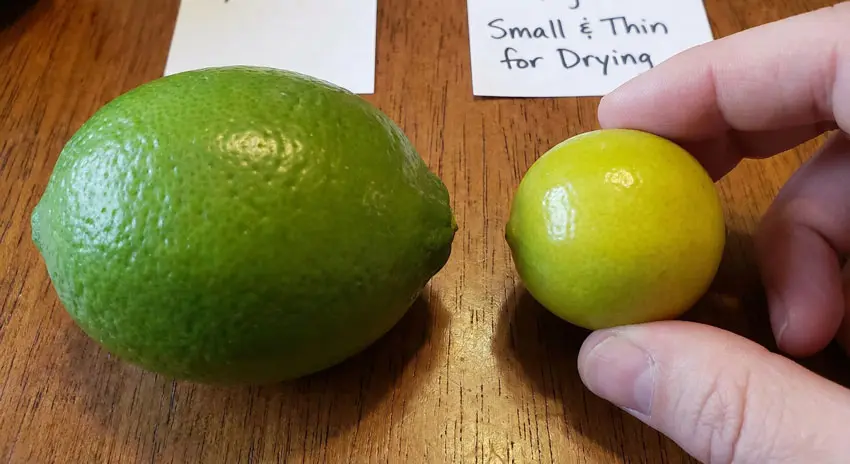
This is where most people go wrong. If you are in Europe or North America, you usually see two main types of limes:
-
Large, Oval Limes (Often called “Persian Limes” in the US): ironically, these are not the best for drying. They have thick skins, and the final result can be a bit dull or bitter.
-
Small, Round Limes (Key Limes or Mexican Limes): These are exactly what we need! They are similar to the Shirazi limes found in Iran. They have very thin skins and high acidity.
The Golden Rule: Choose limes that are small, firm, and have thin, shiny skin. Avoid choosing a thick-skinned one. Yellow or yellowish-green limes work best for this process.
Step 2: Prep and “De-Bittering”
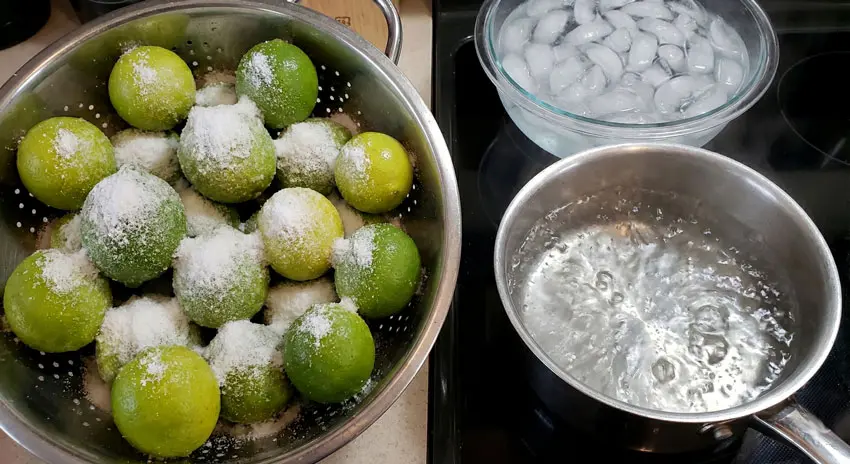
Before drying, we need to treat the skin to make it thinner and remove the bitter oils.
What you need:
-
Small Limes: 1 kg (approx. 2 lbs)
-
White Vinegar: 1 cup
-
Salt: A generous amount
-
Ice water
Phase 1: The Salt Cure (The Traditional Trick)
Wash the limes. Sprinkle a heavy amount of salt over them and let them sit in a colander for about 24 hours.
-
Why? The salt draws moisture out of the peel, thins the skin, and extracts the bitter oils. After a day, rinse them thoroughly.
Phase 2: The Vinegar Shock (For Color)
Bring a pot of water to a boil and add the vinegar. Drop the limes into the boiling water for exactly 60 seconds. Immediately fish them out and plunge them into a bowl of ice water.
-
Why? This stops the cooking process instantly. It prevents the limes from turning black and helps them dry into a nice mustard-brown color.
Step 3: Drying (Sun, Oven, or Radiator?)
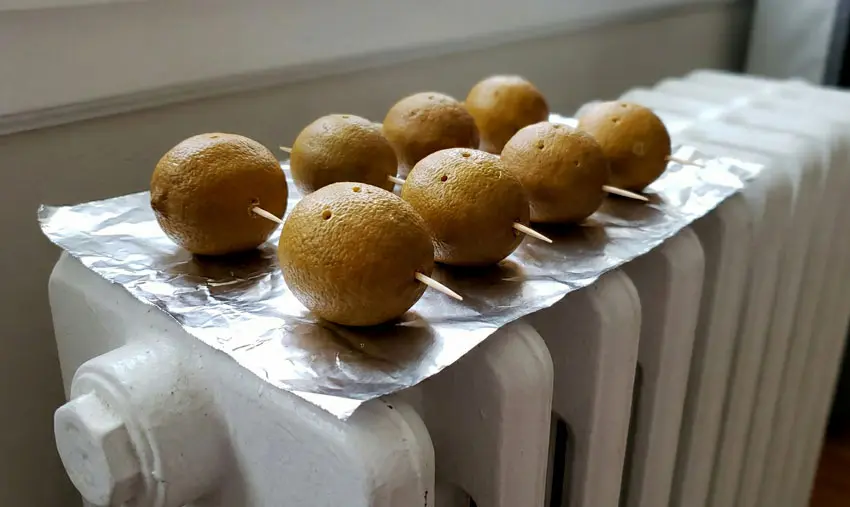
Now, we need to get the moisture out to concentrate on flavour.
Important: Before drying, use a toothpick to poke 3 or 4 small holes in each lime. This lets the steam escape so they don’t explode or rot from the inside.
Method A: The Radiator (Best for Winter/Apartments)
This is the easiest hack for colder climates. Place the limes on a piece of foil or a tray directly on top of your radiator or heater. Turn them over once a day.
-
Time: About 1 to 2 weeks.
Method B: Oven or Dehydrator (Fastest)
-
Oven: Set your oven to the lowest possible setting (around 50°C – 60°C or 130°F). Place limes on a wire rack (not a baking sheet) so air flows underneath. Prop the oven door open slightly with a wooden spoon to let moisture escape.
-
Time: Around 10-12 hours.
Method C: The Sun (The Authentic Way)
If you live in a hot, dry climate (like California, Texas, or Australia), place the limes on a mesh screen in direct sunlight. Bring them inside at night so the morning dew doesn’t ruin them.
The “Shake Test”: How do I know they are ready?
Pick up a lime and shake it. You should hear the dried seeds rattling inside, like a baby rattle.
If it doesn’t make a sound, the center is still wet. If you store them like that, they will mold. The skin should also be rock-hard and brittle.
3 Pro Tips for Better Stews

-
Stop the Bitterness: 90% of the bitterness in Limoo Amani comes from the seeds. Before adding them to your stew, poke holes in the limes and soak them in warm water for 20 minutes. Discard the bitter water, then drop the limes into the pot.
-
Pure Lime Powder: If you have time, crack the dried limes open, remove all the seeds, and grind the skins and pulp. This powder is pure flavor with zero bitterness.
-
Storage: Keep them in a glass jar in a cool, dark cupboard. They will stay fresh and fragrant for up to 2 years.
FAQ
1. Why did my homemade dried limes turn out extremely bitter?
This usually happens for two reasons: either you used large, thick-skinned limes (which have a lot of bitter oil in the peel), or you skipped the blanching/soaking steps. Also, remember that when cooking, the seeds are the main source of bitterness. Always remove them if you are sensitive to bitter flavors.
2. Can I use regular yellow lemons (the big ones) instead?
Technically, yes, but the flavor will be different. Large lemons are sweeter and less intense. Authentic Persian stews rely on the sharp, concentrated sourness of the small Limes. If you can’t find small limes, the big ones are an okay substitute, but the taste won’t be 100% traditional.
3. My limes turned black instead of light brown. Are they ruined?
Not necessarily. In the Middle East, you find both “black” and “brown” limes. Black limes are usually dried longer or at higher temperatures. They have a stronger taste. As long as there is no fuzzy mold inside, they are safe to eat!
4. Do I really need to poke holes in them before drying?
Yes! If you don’t poke holes, the moisture gets trapped inside the thick skin. The inside will rot and ferment before it has a chance to dry out.
5. How many dried limes should I put in my Ghormeh Sabzi?
For a standard pot (serving 4-6 people), 3 to 4 limes are usually enough. It depends on how sour you like it. Remember to pierce them so the stew absorbs the flavor!