Mikado (also known as Mishka) is one of the most nostalgic layered sweets in Iran. It looks a bit like a chocolate wafer, but it has a much deeper, richer flavor thanks to roasted chickpea flour and cinnamon.
If you live outside of Iran and miss the taste of traditional “Shirini” from the pastry shops in Tehran, this recipe is exactly what you need. You don’t need an oven to make it. The secret lies in toasting the flour just right and layering it carefully. This creates a soft yet cohesive texture that goes perfectly with a cup of tea or coffee.
Start by sifting the white flour into a pan. Toast it over low heat. You aren’t trying to darken the color too much; you just want to roast it enough to remove the “raw” smell of the flour. Once done, add the chickpea flour. Be careful: Chickpea flour burns very fast. Stir it constantly and only toast it until the raw scent is gone.
Once the flours are toasted, add the cocoa powder and cinnamon. Mix well until everything is combined. Then, add the solid oil (shortening) and the liquid oil to the pan. Stir until the oils melt and the mixture becomes smooth and dark.
Turn off the heat. Sift the powdered sugar into the pan. Stir thoroughly until you get a loose, smooth paste (the texture should be similar to a soft Halva). This warm, sticky paste is the “glue” that will hold your wafer layers together.
Place one sheet of this wafer on your workspace. Pour some of the warm paste onto it. Use a spatula or a palette knife to spread it thinly and evenly over the entire surface. Place a second wafer sheet on top and press down firmly with your palms to make it stick. Repeat this process until you have 6 layers of wafers (the very top layer must be a plain wafer with no paste on it).
This is a crucial step. Once you have stacked all your layers, place a heavy tray or a heavy flat object on top of them. Put them in the fridge. The weight ensures the layers stick together tightly and don’t fall apart later. Let it cool completely until firm.
Step 6: Coating and Decorating
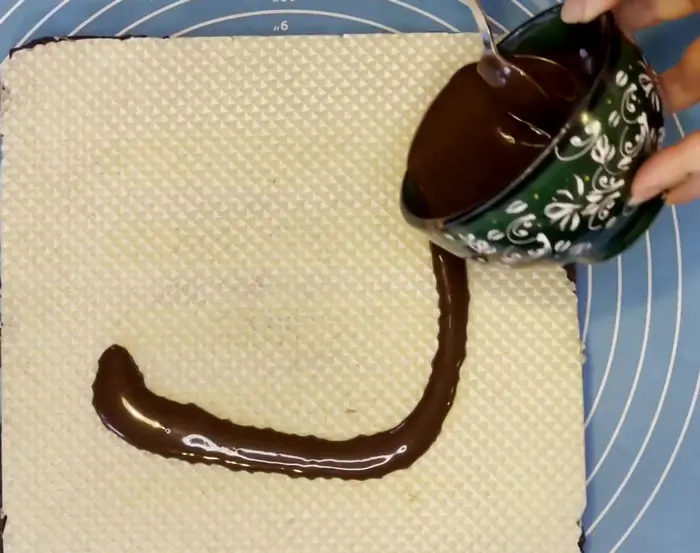
Melt the dark chocolate over steam (Bain-marie) and mix in a tiny drop of oil to make it shiny and smooth.
Important: Take the sweet block out of the fridge and let it reach room temperature before coating. If the sweet is too cold, the chocolate will crack.
Pour the melted chocolate over the top and spread it evenly. For the classic look, melt the white chocolate, pour it into a piping bag, and draw lines across the dark chocolate. Once set, cut the slab into small rectangles with a sharp knife.
“If you enjoy making classic layered sweets like [Shirini Napoleoni], you will find decorating Mikado very relaxing.”
To make sure your sweet looks like it came from a professional bakery and doesn’t fall apart, keep these essential rules in mind:
Spread While Warm: Speed is key. You must spread the paste onto the wafers while it is still warm. If the mixture cools down, it loses its stickiness, and the layers will separate later.
Watch the Consistency: Be precise with the oil. If you add too much liquid oil and the paste becomes too runny, the layers will slide off each other. The paste needs to be thick enough to hold the wafers together.
The “Heavy Weight” Rule: After stacking the layers, place a heavy object on top of them. Leave them in the fridge for at least one hour to set. This pressure ensures the layers fuse perfectly.
Temperature Check: Before pouring the chocolate glaze, let the sweet sit out for a few minutes to reach room temperature. If you pour warm chocolate on a cold surface, the chocolate will crack.
Clean Cuts: To get those sharp, clean edges, use a sharp knife and wipe the blade clean with a cloth after every single cut. This prevents the layers from smearing into each other.
Chocolate Choice: While dark chocolate (60%) is the best choice, the topping is really a matter of taste. You can use white chocolate or milk chocolate if you prefer a sweeter treat.
Have leftover melted chocolate? It makes a perfect drizzle for our simple [Sponge Cake (Cake Esfanji)].
FAQ
1. Why do the layers of my Mikado separate when I cut it?
The layers usually separate for two reasons. First, the paste might have cooled down too much before you spread it; it must be applied while warm to stick properly. Second, you might have skipped the “Heavy Weight” rule. You must place a heavy tray or object on top of the wafers and let them set in the fridge for at least one hour to ensure they fuse.
2. Is chickpea flour really necessary for this recipe?
Yes, it is essential. While this dessert looks like a regular wafer, the roasted chickpea flour is what gives it that deep, rich flavor and distinct “Persian pastry” aroma. Without it, you will miss out on the authentic nostalgic taste mentioned in the recipe.
3. Why does the chocolate coating crack on top of the pastry?
Cracking happens due to a sudden temperature change. If you pour warm, melted chocolate onto a base that is ice-cold from the fridge, the chocolate will shock and crack. Always let the chilled pastry sit out and reach room temperature before you pour the chocolate glaze.
4. Do I need an oven to make this recipe?
No, you do not need an oven. It is a classic no-bake dessert. The entire process is done on the stovetop by toasting the flours and making the paste, followed by assembling the layers on a counter and chilling them in the fridge.
I am Chef Haghighi with ten years of cooking experience and setting up many restaurants and fast food in Iran and Turkey. I am interested in writing recipes on my website. I have the TCA international culinary qualification.I have the experience of successfully launching more than 20 restaurants and fast food in USA and Turkey. I have opened all kinds of traditional restaurants and fast food in Iranian and Turkish style.
You can contact me for advice on equipping restaurants and fast food
In the shortest possible time and for free, I will provide you with advice on buying fast food equipment and setting up a fast food restaurant.